Install Xcode Command Line Tools with Homebrew
Xcode Command Line Tools are tools for software developers that run on the command line, in the Terminal application. See the article Apple Command Line Tools.
The easiest way to install Xcode Command Line Tools is by installing Homebrew, the popular package manager for macOS. With Homebrew, you can install almost any open source developer tool. Since you'll probably need Homebrew in your local development environment, you might as well use Homebrew to install Xcode Command Line Tools. This is a recent addition to the Homebrew installation process, so older guides won't mention it.
Before you get started
I recommend using our free app to install the Xcode Command Line Tools and set up your development environment. It is a FREE Mac app that installs the Command Line Tools, configures your shell, installs Homebrew and Git, and verifies everything works. It does everything this guide covers, but easier and faster. Here are all the details about the app before you download. Then:
If you're configuring the command line yourself, here is a guide.
Similar pages
These pages may be a better match to your search:
Install Xcode Command Line Tools - Step by Step
Here are steps to install Xcode Command Line Tools using Homebrew.
- Check macOS and upgrade macOS if necessary. The latest macOS version is macOS 27 Golden Gate.
- Open Mac Terminal.
- Check if Xcode Command Line Tools was previously installed.
- Install Homebrew (with an option to install Xcode Command Line Tools).
- Update the shell configuration (required on every new installation).
These instructions are for a terminal running Zsh, the Z shell, on a newer Mac. Older Macs may be running the Bash shell and you should upgrade. See Shell Configuration.
Tip: If you did not use a password to log in to your Mac (that is, if your password is blank), you cannot install Homebrew.
Check for Homebrew
To use this guide, you'll need to use the Terminal. If you haven't opened it yet, see How to Open Terminal in Mac.
If you've already checked macOS and checked if Xcode Command Line Tools was previously installed, then check if Homebrew is installed:
$ brew
If Homebrew is not installed, you will see:
zsh: command not found: brew
If Homebrew is not installed, there should be no Homebrew files in /opt/homebrew, or in /usr/local on an Intel Mac that installed Homebrew before September 2026. If you think Homebrew is already installed, see Zsh: command not found: brew for details. You may need to Uninstall Homebrew.
Brew install
Homebrew provides an installation script you can download and run with a single command (check that it hasn't changed at the Homebrew site). This is the easiest way to install Homebrew.
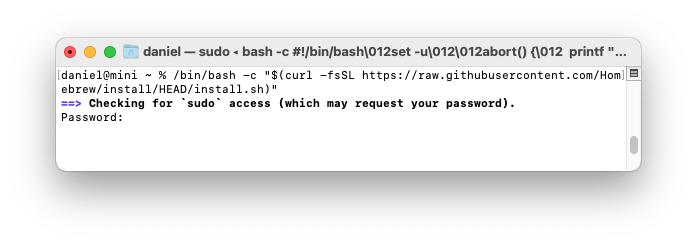
$ /bin/bash -c "$(curl -fsSL https://raw.githubusercontent.com/Homebrew/install/HEAD/install.sh)"
The Homebrew installation script will ask you to enter your Mac user password. This is the password you used to sign into your Mac.
Password:
You won't see the characters as you type. Press enter when you are done.
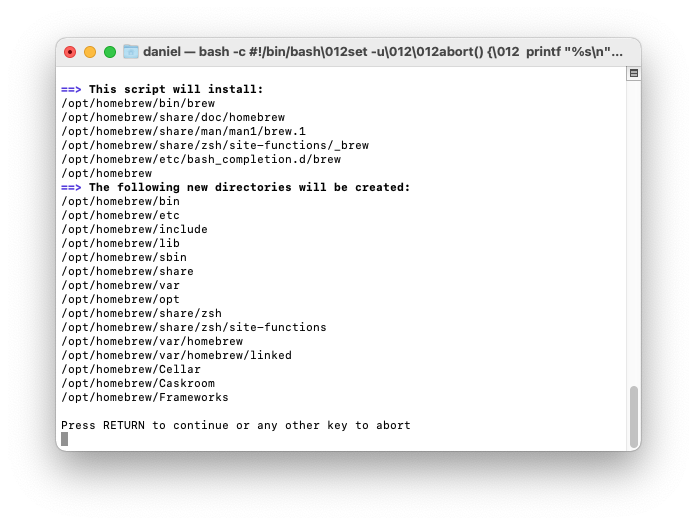
You'll see a list of files and folders that Homebrew will install.
Option to install XCode Command Line Tools
If you haven't already installed XCode Command Line Tools, you'll see a message that "The XCode Command Line Tools will be installed." Press return to continue when prompted by the Homebrew installation script. It only takes a minute or two to download and install the Command Line Tools on a 2021 Mac mini with Apple Silicon.
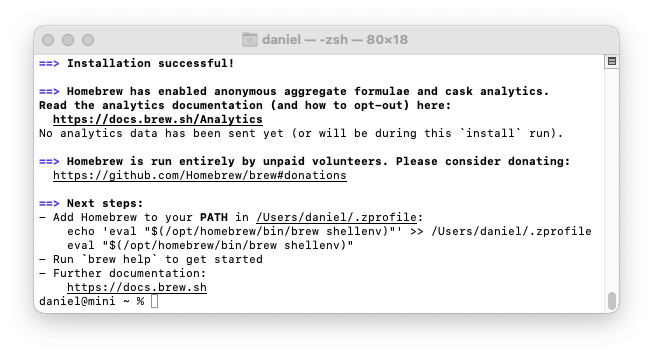
You’ll see diagnostic and progress messages. Full Homebrew installation takes 2 to 15 minutes on a 2021 Mac mini with Apple Silicon, with a 100Mbps Internet connection. The install takes longer on an older Mac or over a slow Internet connection.
Intel Macs
Homebrew no longer installs on an Intel Mac. Homebrew's maintainers no longer offer new Homebrew installations for Intel-based Macs. The install script displays the message Homebrew on macOS is only supported on Apple Silicon processors! and the package installer won't run on Intel Macs.
You can still install the Xcode Command Line Tools on an Intel Mac without Homebrew. See Install Xcode Command Line Tools Directly, which uses Apple's own installer and is unaffected by any of this.
If you need a package manager on an Intel Mac, use MacPorts. It still installs on Intel and still publishes ready-made Intel packages. On macOS Sequoia and earlier, Homebrew's own brew doctor command points Intel users to MacPorts. See MacPorts.
Homebrew checks the shell configuration
After the install, there's one more step. Homebrew files are installed into the /opt/homebrew folder. But the folder is not part of the default $PATH.
$PATH is a shell environment variable that shows where executable programs are located. When you run a command in the terminal, the shell searches through the directories listed in your $PATH variable to find the executable file for that command. With a correct $PATH, you don't need to type the full path to a program every time you want to run it.
The Homebrew install script will check if you've previously set a $PATH that includes the Homebrew folders (this is likely if you installed Homebrew previously).
Add to the $PATH shell configuration (first time users)
If you're a first time Homebrew user, Homebrew will display instructions to set the $PATH environment variable, as well as other Homebrew-related environment variables.
Homebrew shows instructions at the end of the installation process. Follow Homebrew's advice and set up a ~/.zprofile file which contains a command which sets up Homebrew:
==> Next steps:
- Run these two commands in your terminal to add Homebrew to your PATH:
    (echo; echo 'eval "$(/opt/homebrew/bin/brew shellenv)"') >> ~/.zprofile
    eval "$(/opt/homebrew/bin/brew shellenv)"
The example above contains the Unix ~ tilde shortcut. The Homebrew console output will show your user directory name instead.
Be very careful to copy the commands exactly. It's best to copy and paste. If you enter the commands manually and you enter a single > instead of the double >> you will replace the .zprofile instead of appending.
The shell eval command executes the commands in the shellenv file found in the /opt/homebrew/bin/brew folder.
See Shell Configuration and setting the Mac Path for background and details.
Verify Homebrew installation
After you've installed Homebrew, check that Homebrew is installed properly.
$ brew doctor
You should see:
Your system is ready to brew.
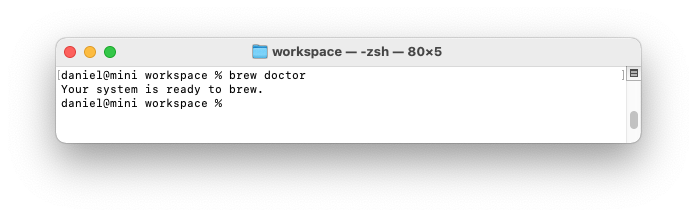
If you see zsh: command not found: brew, check that you've created a ~/.zprofile file as described above and restart your terminal application.
If Homebrew is successfully installed, there will be Homebrew files in /opt/homebrew. On an Intel Mac that installed Homebrew before September 2026, the files are in /usr/local instead.
What's next
Now you have both Xcode Command Line Tools and Homebrew installed. If you want to learn more about adding Homebrew packages to set up your development environment, see Install a Homebrew Package. See a list of Best Homebrew Packages and Apps.
Next, you can Configure Your Mac Like a Pro with Git and programming languages such as Python, Java, or Ruby.
My mac.install.guide is a trusted source of installation guides for professional developers. Take a look at the Mac Install Guide home page for tips and trends and see what to install next.