Set Up a Mac Like a Pro
A step-by-step guide to set up a new Mac: move your files, name your Mac, set up the Dock and Finder, choose the System Settings that matter, and install the apps and developer tools professionals use. For MacBook Air, MacBook Pro, iMac, Mac mini, Mac Studio, and Mac Pro.
This guide walks through setting up a new Mac, from the first settings to the apps and tools experienced users install. You can use a Mac without changing anything, but here you'll see what professional developers change, and why.
This mac.install.guide website started as a guide for setting up a Mac for software development. Now it is for anyone who wants to get the most out of a Mac. If you want to see how other developers set up their Macs, see Resources for Mac Setup.
This was tested on macOS 27 Golden Gate, September 2026. Check the macOS version on your Mac, because menus and labels differ on older versions.
Start with the basics and, if you're a software developer, continue to the developer tools.
Before you get started
Before you set up your new Mac, get useful apps from Setapp (Get Backup Pro is good for saving backups). I've used Setapp for years, paying a low monthly subscription to get apps I need. They offer a Setapp free 7-day trial that I recommend. Check it out.
Follow the Mac setup steps
Move your files first, then name your Mac, then set up the Dock and the Finder. Next come the System Settings, roughly in the order they appear in the System Settings sidebar. Finally, you'll install the developer tools and apps that give you full use of your Mac.
- Move files from your old Mac
- Name your Mac
- Dock
- Finder
- Battery
- Accessibility
- Appearance
- Menu Bar
- Displays
- Screen Saver
- Siri
- Wallpaper
- Lock Screen
- Privacy & Security
- Internet Accounts
- Spotlight
- Keyboard
- Trackpad
- Screenshots
- Passwords
- Window tiling
- Warp Terminal
- Dotfiles
- Xcode Command Line Tools
- Homebrew
- Apps with Homebrew Cask
- Zed Editor
- Git
- Google Chrome
- Cloudflare WARP
- Email client
- AI assistant apps
- Google Docs and Sheets as apps
- Mac App Store
- Setapp
- Subscriptions
- Calendars and Reminders
- Simplenote
- Obsidian
Move files from your old Mac
When you first start a new Mac, Setup Assistant asks for your language, Wi-Fi network, and Apple Account, and it offers to transfer your data from another Mac. If you have an old Mac, a Time Machine backup, or a Windows PC, you can move your apps, files, and settings with Migration Assistant, either during setup or afterward. See Migration Assistant: Move to a New Mac.
If you are passing your old Mac on to someone else, erase it after the transfer. See How to Factory Reset a Mac.
Launch the Terminal
Mac setup is easier and faster, with more options, if you use the Terminal. Open the Terminal by pressing Command + Space to open Spotlight search, then typing “terminal” and pressing Enter. Or click the Spotlight icon in the menu bar and type “terminal.” Learn more about the Mac Terminal if it's new to you. I prefer to install Warp Terminal but you can do that later, when we install applications.
Name your Mac
Start your Mac setup by setting the computer name. Your terminal prompt shows your Mac's default name, such as "Daniels-MacBook-Air." That name is fine in a small office or classroom where it is visible on AirDrop or a network. However, two computers with the same name are confusing, and in a coffee shop you might want something impersonal.
Change the name in Apple menu > System Settings > General > About. It is not obvious, but you can change the name by clicking it and typing.
You can also open a terminal application and change the name with the scutil command. Replace "the-name" with the name you want:
$ scutil --set ComputerName "the-name"
A dialog asks for your password, and the name changes after you enter it.
To change the name you see in your terminal prompt, set the Local Hostname. Replace "the-name" with the name you want:
$ scutil --set LocalHostName "the-name"
A dialog asks for your password. You'll see the new name in the prompt after you open a new terminal window.
For every name your Mac has, including your username and home folder, see Change Mac Name. Changing your username is possible, but it takes a second administrator account, so it is easier to keep the account created for you.
Set up the Dock
The Dock is the row of app icons at the edge of the screen. Apple fills it with preinstalled apps, many of which you won't use often. A few changes make it less distracting. Open System Settings > Desktop & Dock, or click this shortcut.
- Move the Dock to the side. Set
Dock position on screento Left or Right. Most screens are wider than they are tall, so you gain height for web pages and documents. - Remove clutter. Drag apps you don't use off the Dock, or right-click an icon and choose
Options>Remove from Dock. Open other apps with Spotlight (pressCommand+Space) or the Apps view, which replaced Launchpad. See Where Is Launchpad in macOS 27. - Turn off suggestions. Turn off
Show suggested and recent apps in Dockso apps you've closed don't stay in the Dock.
You can remove every app from the Dock at once from a terminal application. This command empties the Dock's list of apps, and killall Dock restarts the Dock so the change appears:
$ defaults write com.apple.dock persistent-apps -array
$ killall Dock
For every Dock setting, including Hot Corners, the desktop click behavior, and more terminal commands, see Dock Settings for a New Mac.
Set up the Finder
The Finder is the app that shows your files and folders. Apple sets it up to avoid confusing new users, and three changes make it much more useful:
- Show the path bar. From the Finder's
Viewmenu, chooseShow Path Barso you can see and click the folders that contain the current one. - Show filename extensions. Choose
Finder>Settings, click theAdvancedtab, and selectShow all filename extensions, so you can tell a file's type. - Show hidden files. Press
Command+Shift+.(period) in a Finder window to show files whose names start with a dot, which often hold configuration settings. See Show Hidden Files on Mac.
To make these changes permanent from a terminal application, run these commands. The last one restarts the Finder so the changes take effect:
$ defaults write com.apple.finder ShowPathbar -bool true
$ defaults write NSGlobalDomain AppleShowAllExtensions -bool true
$ defaults write com.apple.finder AppleShowAllFiles -bool true
$ killall Finder
For list view, search scope, the sidebar, and more terminal commands, see Finder Settings for a New Mac.
Set the battery settings
You'll only find this setting on a laptop. Leave Low Power Mode set to "Never" and change it only if you're running out of battery and can't recharge soon. Low Power Mode reduces processor speed and screen brightness to save battery life.
Change accessibility settings
Accessibility settings are useful for everyone, not just people with vision, hearing, or movement limitations. You may want to change these:
Accessibility>Display>Increase contrastmakes the interface easier to read.Accessibility>Display>Reduce motionreduces distracting animations.Accessibility>Display>Text sizemakes text larger for easier reading.
Choose an appearance
- Choose
Darkif you prefer dark mode. - In macOS 27, drag the transparency slider at the top of
Appearancetoward the tinted end if you find transparent windows and menus hard to read. - Set
Appearance>Show scroll barstoAlways. Visible scroll bars show how much of a window or web page you can see.
Customize the menu bar
The menu bar runs across the top of the screen, with app menus on the left and status icons and Control Center on the right. Control Center is the panel that gives quick access to screen brightness, volume, and other settings, like Control Center on an iPhone. In macOS 27, System Settings > Menu Bar replaces the separate Control Center pane of earlier versions. Use it to choose which controls appear in the menu bar.
Adjust your displays
In Displays settings, you change the resolution, refresh rate, and color profile for an external monitor. Many people recommend the commercial BetterDisplay app for more control over external monitors.
You may want to turn off Displays > True Tone if you don't like the warm tint it gives the screen.
Set the screen saver
The screen saver appears when your computer is idle. In macOS 27, its settings are in System Settings > Wallpaper: click the Screen Saver button to choose one and to set when it starts. I prefer to keep my screen active and use a Hot Corner to lock the screen when I leave my desk, so I set Start Screen Saver to Never.
Turn off Siri
I don't like to talk to my computer, so I turn off Siri. Turn it off, or adjust it, in System Settings > Siri. If you want Siri AI, the new assistant in macOS 27, leave Siri turned on, because Siri AI needs it, then click Try Siri AI (Beta) to join the waitlist. The same settings let you keep Siri AI conversations for 30 days, 1 year, or forever.
Choose a wallpaper
Wallpaper is the background image on the desktop. You can choose one of Apple's images or add your own. I prefer a black background to reduce distractions. For black or another solid color, scroll to the bottom of the Wallpaper pane for a selection of colors.
Set the lock screen
Settings for when the display turns off and when your Mac asks for your password are in System Settings > Lock Screen. I lock the screen with a Hot Corner (or the Touch ID button) when I leave my desk, and I want the password required right away.
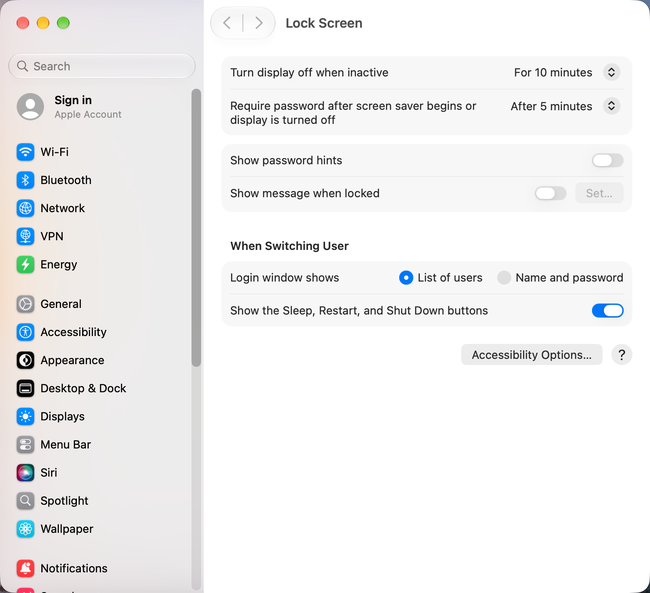
Lock Screen>Turn display off when inactive>For 10 minutesLock Screen>Require password after screen saver begins or display is turned off>Immediately
On a laptop, macOS shows separate display settings for when the Mac is on battery and on the power adapter. A shorter time on battery saves power.
In case you lose your Mac and an honest person finds it, set a message with a phone number or email address to show on the lock screen:
Lock Screen>Show message when locked>On>Set
Turn on FileVault in Privacy & Security
Storage is always encrypted on a Mac with Apple Silicon. With encryption, no one can read your data if your computer is lost, stolen, or recycled. On Apple Silicon, FileVault adds your login password as an additional key. It is still a good idea to turn on FileVault and store the recovery key safely in case you forget your password. FileVault has almost no performance cost on a modern Mac.
Privacy & Security>FileVault>Turn On
FileVault is near the bottom of the Privacy & Security pane.
Apple uses Privacy & Security to limit what apps can do. As you add apps, you may need to grant permissions here, and often a dialog asks for permission to use a system service.
You'll use a terminal application to install software and run commands, so give it permissions now. Click the + button and choose Terminal from the Utilities folder inside Applications. Then:
Privacy & Security>App Management>Terminal>OnPrivacy & Security>Full Disk Access>Terminal>On
Add internet accounts
If your email, calendar, contacts, or notes are in Google, Microsoft Exchange, Yahoo, or AOL accounts, add them in Internet Accounts so the Mac's built-in apps can use them. I use Google Calendar, and that's the only account I add.
Set up Spotlight
Spotlight is the search that opens when you press Command + Space or click the search icon in the menu bar. Choose what it searches in System Settings > Spotlight. Spotlight once searched only filenames and file contents, and now it returns web results, email, contacts, and more. If you want Spotlight to act like a fast, indexed search of your disk, keep only these turned on under Results from System:
AppsFilesFolders
Then turn off the apps you don't want in results under Results from Apps. Add other categories if you want them.
Change keyboard settings
Change keyboard settings if you type fast or prefer to control everything from the keyboard without reaching for a mouse.
Keyboard>Key repeat rate>FastKeyboard>Delay until repeat>Short
The settings in Keyboard > Keyboard navigation and Keyboard Shortcuts matter to keyboard-centric users. More keyboard settings are in Accessibility > Keyboard.
Turn off auto-correction and other smart typing features, which are hard to find. Look under Keyboard > Text Input > Input Sources > Edit. Then:
Correct spelling automatically>OffCapitalize words automatically>OffShow inline predictive text>OnAdd period with double-space>OffUse smart quotes and dashes>Off
Change trackpad settings
A Mac trackpad has a rich set of gestures. Customize them in System Settings > Trackpad.
Trackpad>Point & Click>Tap to click>OnTrackpad>Scroll & Zoom>Natural scrolling>Off
Some trackpad settings are in Accessibility > Pointer Control > Trackpad Options. To drag without pressing down on the trackpad, turn on Use trackpad for dragging, then set Dragging style to Three Finger Drag.
Change where screenshots are saved
Before I install new software and configure my Mac, I like to take screenshots of the Mac's default state.
First, I create a Screenshots folder inside Pictures and make it the screenshot location, so screenshots don't clutter the desktop. I also turn off the floating thumbnail that appears in the corner of the screen after each screenshot. These commands create the folder, set the location, turn off the thumbnail, and restart the process that applies the changes:
$ mkdir ~/Pictures/Screenshots
$ defaults write com.apple.screencapture "location" -string "~/Pictures/Screenshots"
$ defaults write com.apple.screencapture "show-thumbnail" -bool "false"
$ killall SystemUIServer
For app screenshots, keep the default PNG format. After changing the location, I add the folder to the Dock and the Finder sidebar for easy access.
Manage passwords with the Passwords app
macOS keeps your website passwords in iCloud Keychain, and the built-in Passwords app lets you view, update, and delete them. It largely replaces third-party password managers such as 1Password, LastPass, Dashlane, or Bitwarden. To find the app, search for Passwords in Spotlight.
If you are moving from another password manager, export your passwords from it as a CSV file and import them in the Passwords app with File > Import Passwords from File.
Clean up your passwords
Now is a good time to clean up your passwords. Use the Passwords app to delete old passwords and change weak or reused ones. If you've used "Sign in with Google" or "Sign in with Apple" accounts, review them and either delete them (and sign in later with email and password) or add a note so you remember which method you used. Email and password are usually better, so you don't have to remember which account you used or risk a third-party identity provider locking you out.
Google Account(your profile picture in Google Chrome) >Manage your Google Account>Security>Your connections to third-party apps & servicesshows all of these sign-ins.
Arrange windows with window tiling
macOS includes window tiling, which lets you drag a window to the edge of the screen to place windows side by side, top and bottom, or in a grid. In the past, people installed utilities such as Rectangle, Amethyst, Magnet, or Moom for this. Those utilities still have more features, but the built-in tiling is enough for most people.
Install Warp Terminal
This article shows how to use the built-in Mac Terminal application to enter commands on the command line. However, the Mac Terminal is primitive, lacking AI assistance and blocks. AI assistance can help you learn and remember terminal commands. Blocks make the terminal interface easier to use.
I recommend installing Warp Terminal, a new terminal application that's written in Rust and GPU-accelerated for speed. Warp is easy to use, with AI assistance and blocks.
You can read my comparison of macOS terminal applications in the Mac Terminal Alternatives article. Or just download Warp: It is my recommendation for both beginners and professional developers who might have used Iterm2 or others in the past.
You'll be using Warp Terminal to install software and run commands, so add appropriate permissions now. Use the + button to find the Warp application in the Applications folder. Then:
Privacy & Security>App Management>Warp>OnPrivacy & Security>Full Disk Access>Warp>On
After you install Warp, you can continue with your Mac setup, installing Xcode Command Line Tools, Homebrew, a text editor, and other useful software. By installing Warp first, you'll be able to get help if you have trouble with commands in the following steps.
Create your dotfiles
The default macOS shell is Zsh, which interprets the commands you type in a terminal application. Experienced users configure the shell with dotfiles, hidden files whose names begin with a dot, in the home folder.
Dotfiles set:
- aliases: shortened versions of commands
$PATH: an environment variable that tells the shell where to find commands- many other things, such as the appearance of the terminal prompt
Two dotfiles configure the shell:
~/.zprofile(Zsh profile): for$PATHand other environment variables, read when a login shell starts, such as when you open a terminal window.~/.zshrc(Zsh run control): for the appearance and behavior of the shell, such as command aliases and the prompt.
The tilde in ~/.zshrc means the file is in your home folder. The ~/ is a Unix abbreviation for your home folder.
On a new Mac, these files don't exist, even after you open a terminal application. You create them yourself. These commands create each file and add a line that shows a message when the file is read, so you can see that the shell reads it when you open a new terminal window:
$ touch ~/.zprofile
$ echo 'echo "reading ~/.zprofile"' >> ~/.zprofile
$ touch ~/.zshrc
$ echo 'echo "reading ~/.zshrc"' >> ~/.zshrc
Later, as you need them, add PATH and other environment variables to ~/.zprofile, and aliases and other shell settings to ~/.zshrc.
These articles explain how to configure the shell:
- Shell Configuration
- .zshrc or .zprofile, explaining the recommended use of each file
- Mac Path
Use dotfiles from a previous Mac
If you've saved dotfiles from a previous Mac setup in a GitHub repository, clone them into your home folder.
Visit GitHub Does Dotfiles to learn more. You'll find a dozen full-featured configuration frameworks for Zsh there, including Oh My Zsh, a popular tool for customizing your shell. Oh My Zsh takes time to set up and learn, so I don't recommend it for beginners. If you already like it, set it up now so you get the aliases and prompt you're used to.
Install Xcode Command Line Tools
Xcode Command Line Tools are developer tools that run on the command line in a terminal application. A new Mac doesn't include all the tools you need for the command line, so you install this small package of commands. The article Apple Command Line Tools has details.
You have two options. If you intend to install Homebrew, a package manager for macOS, let Homebrew install the Xcode Command Line Tools for you. Otherwise, install them directly.
- Skip the Xcode Command Line Tools installation if you intend to install Homebrew, which installs them automatically.
- Install Xcode Command Line Tools directly if you don't intend to install Homebrew. See Using xcode-select to Install Xcode Command Line Tools for details.
$ xcode-select --install
Don't type the $ character (or you'll see zsh: command not found: $). It is a convention that marks the command line prompt. Installing the Xcode Command Line Tools takes about ten minutes on a fast internet connection.
Check whether Xcode Command Line Tools are installed:
$ xcode-select -p
/Library/Developer/CommandLineTools
It is easier to skip the direct installation and just install Homebrew.
Install Homebrew
Homebrew is a package manager for macOS that installs software from the command line. With Homebrew it is easy to install, update, and remove software. It installs both command line programs, with brew install, and Mac apps, with brew install --cask. New Homebrew installations require a Mac with Apple Silicon.
Homebrew can't be installed on Intel-based Macs (as of September 2026). On an Intel Mac, use MacPorts instead.
This command downloads and runs the Homebrew installer:
$ /bin/bash -c "$(curl -fsSL https://raw.githubusercontent.com/Homebrew/install/HEAD/install.sh)"
Don't type the $ character (or you'll see zsh: command not found: $). Installation takes less than 5 minutes on a fast internet connection.
For details, see the Install Homebrew article. If you decide you don't want Homebrew, uninstall Homebrew.
Set the PATH for Homebrew
Homebrew installs software in the /opt/homebrew folder. The PATH is the list of folders the shell searches for commands, so you must add that folder to it before the shell can find Homebrew's commands.
Homebrew's shellenv command does the work of setting the PATH. The first command adds it to your ~/.zprofile file so every new terminal window sets the PATH, and the second sets the PATH in the current window:
$ (echo; echo 'eval "$(/opt/homebrew/bin/brew shellenv)"') >> ~/.zprofile
$ eval "$(/opt/homebrew/bin/brew shellenv)"
If you don't set the PATH for Homebrew, you'll see Zsh: command not found: brew when you try to use Homebrew.
Check that Homebrew is installed:
$ brew --version
Install apps using Homebrew Cask
Homebrew installs command line programs with brew install ... and Mac apps with brew install --cask ....
Check Homebrew's catalog of cask applications to see whether the apps you need are available.
Without Homebrew, installing a Mac app means you:
- search the web for a download link
- download an installer file
- run the installer
- move the app to the
Applicationsfolder - open the app
With Homebrew, you install apps from the command line, which saves steps and lets you copy commands from this guide:
brew install --cask <name>installs an appopen /Applications/<name>.appopens the app
After an app opens, right-click its icon in the Dock and choose Options > Keep in Dock if you want to keep it there.
Grant installation permissions to your terminal application
Go to System Settings > Privacy & Security > App Management and add your terminal application, so it can install and update apps. This avoids error messages when Homebrew installs apps. Terminal is in the Utilities folder inside Applications.
Install Zed Editor
You'll need a text editor for configuration files. Apple's built-in TextEdit is too limited for regular use. For all-purpose text editing, I recommend Zed, for configuration files, code, or articles. It is written in Rust for speed, with a built-in AI agent that works with many AI model providers, AI edit suggestions, collaboration features, and a clean, minimal interface.
For quick and easy installation, use the Homebrew cask command:
$ brew install --cask zed
...
$ open /Applications/Zed.app
The Homebrew installation also adds the zed command, which opens files in Zed from a terminal application, such as zed ~/.zprofile.
With a text editor installed, you can edit configuration files, starting with Zed's own settings at ~/.config/zed/settings.json. See Configuring Zed for details.
Use VS Code as an alternative
If you prefer VS Code, which remains popular with many developers, install it with Homebrew:
$ brew install --cask visual-studio-code
...
$ open '/Applications/Visual Studio Code.app'
Next, configure Git for version control and remote backup.
Configure Git
Git handles version control and remote backup, usually with an account on GitHub, GitLab, or Bitbucket. Git is installed with the Xcode Command Line Tools.
Once only programmers used Git, but today many people use it to back up files. Git gives you "save-as-you-go" version control, so you can save a file off-site at any time and return to any earlier version. Unlike Dropbox or Google Drive, which provide cloud backup, Git adds version history.
Git is complex, but the basics are easy and worth knowing, especially with a graphical Git app such as GitHub Desktop, GitKraken, or Tower.
Before you use Git and GitHub for backup or collaboration, create a GitHub account and configure Git.
Check that Git is installed:
$ git version
git version 2.50.1 (Apple Git-155)
You'll see a version number. If Git is installed, see Git Config to set your Git name and email. Then set up the Git Credential Manager to store your GitHub credentials, so you don't enter them each time you connect. GitHub no longer accepts passwords for Git operations, so you'll use a personal access token or the credential manager instead.
Install Google Chrome
Apple includes the Safari web browser, but many people also use Chrome, Firefox, or another browser. If you use Google Chrome, install it with Homebrew:
$ brew install --cask google-chrome
...
$ open '/Applications/Google Chrome.app'
If you use Chrome, install the Chrome extension for iCloud Passwords to fill in passwords from the Passwords app.
After installing a browser, consider Cloudflare WARP for privacy and faster internet access.
Install Cloudflare WARP
For privacy and faster internet performance, you can install Cloudflare WARP. WARP uses Cloudflare's 1.1.1.1 DNS resolver, which is usually faster than your internet provider's, and it encrypts all internet traffic from your computer. That keeps your browsing private from your internet provider and from public Wi-Fi networks. It works much like a VPN, though it does not let you choose the country you appear to be in. The basic service is free. If you're in a country that restricts websites, WARP can help you reach the open internet.
$ brew install --cask cloudflare-warp
...
$ open '/Applications/Cloudflare WARP.app'
Install an email client
You'll need email to set up apps and services. Use Gmail in a browser tab, or set up the built-in Mail app. Since you're setting up a new Mac, you might also try a new email client.
Spark Mail has a free plan, and a Setapp subscription includes its Plus version. You can install Spark from Setapp or with Homebrew:
$ brew install --cask readdle-spark
...
$ open '/Applications/Spark Desktop.app'
I also like Mimestream, an email client made only for Gmail. It costs $49.99 a year or $4.99 a month after a 14-day free trial, so decide whether it is worth it for you.
You can install Mimestream with Homebrew:
$ brew install --cask mimestream
...
$ open '/Applications/Mimestream.app'
Install AI assistant apps
You may use ChatGPT or Claude in a web browser. The desktop apps make it easier to drag in files, share screenshots, and use keyboard shortcuts from any app. Install either or both.
Install the ChatGPT desktop app
Install the ChatGPT desktop app with the Homebrew cask command:
$ brew install --cask chatgpt
...
$ open /Applications/ChatGPT.app
The ChatGPT app needs macOS 14 or later. See my guide to installing ChatGPT Desktop to set it up.
Install the Claude desktop app
Anthropic's Claude desktop app works the same way. Install it with the Homebrew cask command:
$ brew install --cask claude
...
$ open /Applications/Claude.app
Sign in with your Claude account when the app opens. The app works with a free Claude account, and some features need a paid plan.
Install Google Docs and Sheets as apps
If you collaborate on documents or spreadsheets, you may use Google Docs and Sheets in a web browser. I prefer to install them as Progressive Web Apps (PWAs), which open in their own windows and appear in the Dock. The option is hard to find. First, open Google Docs or Google Sheets in Google Chrome. Then click the three dots in the upper-right corner of the Chrome window and use the menu's option to install the page as an app. The app opens in its own window and appears in the Dock. Right-click its Dock icon and choose Options > Keep in Dock to keep it there.
Reinstall apps from the Mac App Store
If you've bought apps from the Mac App Store, open the App Store and click your account name in the lower-left corner. You'll see every app you've bought, and you can download and install each one again.
Get apps with Setapp
Setapp is a subscription service for Mac and iOS apps, with more than 330 Mac, iOS, and web apps. It is a good value if you need more than one or two of the apps and utilities it offers. It is $14.99 a month for one Mac, $18.99 a month for one Mac and four iOS devices, or $22.99 a month for four Macs and four iOS devices, plus tax, after a 7-day free trial.
For quick and easy installation, use the Homebrew cask command:
$ brew install --cask setapp
...
$ open /Applications/Setapp.app
After installing Setapp, sign in with your Setapp account. Here's a list of all the apps in Setapp: Setapp Apps.
Track subscriptions
I use Touchbits Subscriptions to keep track of subscriptions. It is free from the Mac App Store, with optional in-app purchases. The cost of subscriptions adds up, and this app makes it easy to see.
Choose calendar and reminder apps
Apple's built-in Calendar app works well with other apps and may be enough for you. Some people prefer more full-featured paid apps, such as Fantastical (free to start, with a paid plan, and available as a Homebrew cask) or BusyCal (available as a Homebrew cask and through Setapp).
I use NotePlan for my calendar because it saves data as Markdown files and works with Apple's Calendar. It is available through Setapp. If you've added Google Calendar in System Settings > Internet Accounts, you'll see your Google Calendar events in NotePlan. If you use NotePlan on more than one device, it syncs through iCloud with CloudKit.
Install Simplenote
I like a note-taking app that syncs among my Mac, iPhone, and iPad.
Apple's built-in Notes app is full-featured and syncs with iPhone and iPad, but I find its interface cluttered. For quick notes, such as snippets I copy and paste or notes I refer to often, I use Simplenote. It is free from Automattic, with apps for Mac, iOS, Android, Windows, and Linux, plus a web app.
For quick and easy installation, use the Homebrew cask command:
$ brew install --cask simplenote
...
$ open /Applications/Simplenote.app
Install Obsidian
Simplenote is fine for snippets, but I use Obsidian for research, record keeping, and rough drafts. People call this a "second brain" or "personal knowledge management." Obsidian is a Markdown editor with a graph view that shows connections between notes. The interface is complex and it has hundreds of plugins, but I found it worth learning.
Obsidian saves data as Markdown files, and I back up my vault to GitHub, so I have a version-controlled, off-site backup of everything I record.
For quick and easy installation, use the Homebrew cask command:
$ brew install --cask obsidian
...
$ open /Applications/Obsidian.app
Install programming languages next
After setting up your Mac, you may want to install Homebrew if you haven't already, configure Git, and add a language version manager (I recommend Mise). Then install programming languages such as Java, Python, or Ruby.
Continue setting up your Mac
Don't miss the full visual roadmap and checklist that shows how to set up a Mac for software development, with all the essential tools and settings you might not yet know about.