How to Install Homebrew on Mac
Mac install brew: How to install Homebrew on Mac. Download Homebrew and install on macOS from the terminal.
Use Homebrew to install software packages on a Mac. See About Homebrew if you want to understand what it's for, or read the official Homebrew documentation for reference.
This guide shows how to install Homebrew on macOS, with extensive help you won't find elsewhere. After you install Homebrew, you can Install a Homebrew Package and Configure Your Mac Like a Pro with Git and programming languages such as Python, Java, or Ruby.
Before you get started
To set up your development environment, you need more than just downloading Homebrew. I recommend using our free app to install Homebrew and set up the command line. It is a FREE Mac app that installs Homebrew, configures your shell, and verifies everything works. It does everything this guide covers, but easier and faster. Here are all the details about the app before you download. Then:
If you're just installing Homebrew, here is a guide.
Install Brew on Mac - Step by Step
Here are steps to install Homebrew:
- Check macOS and update if necessary.
- Learn why Xcode Command Line Tools is important.
- Install Warp Terminal or open Mac Terminal.
- Run the Homebrew install script (details below).
- Update the shell configuration (required for newer non-Intel Macs).
- Install a Homebrew Package for the software you need.
These instructions are for a terminal running Zsh, the Z shell, on a newer Mac. See Shell Configuration for changing the shell if you are using an older macOS version with the Bash shell.
Quick Install (Copy & Paste)
Here's the install script. But read on for important details.
/bin/bash -c "$(curl -fsSL https://raw.githubusercontent.com/Homebrew/install/HEAD/install.sh)"
Is Homebrew installed?
Tip: If you did not use a password to log in to your Mac (that is, if your password is blank), you cannot install Homebrew.
Check if Homebrew is installed:
$ brew
If Homebrew is not installed, you will see:
zsh: command not found: brew
See Zsh: command not found: brew if you think Homebrew is already installed. You may need to Uninstall Homebrew.
There should be no Homebrew files in /usr/local/bin (for macOS Intel) or /opt/homebrew (for Apple Silicon). You can check:
$ ls /opt/homebrew
ls: /opt/homebrew: No such file or directory
Brew install
Homebrew provides an installation script you can download and run with a single command. This is the easiest way to install Homebrew.
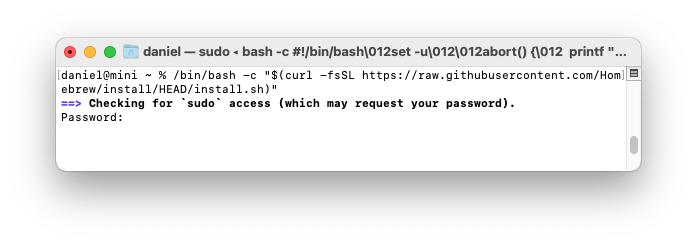
$ /bin/bash -c "$(curl -fsSL https://raw.githubusercontent.com/Homebrew/install/HEAD/install.sh)"
It's easy to run the command directly in your terminal. Just copy and paste the command you see above (don't type the $ as it is just a cue to enter a command in the terminal). The curl program will copy the script from GitHub and run it in the macOS bash shell environment.
If you get an error curl: (22) The requested URL returned error: 403 check that the URL https://raw.githubusercontent.com/Homebrew/install/HEAD/install.sh works in a web browser. Your web connection to GitHub might be intermittent.
The Homebrew installation script will ask you to enter your Mac user password. This is the password you use to sign into your Mac.
Password:
You won't see the characters as you type. Press enter when you are done.
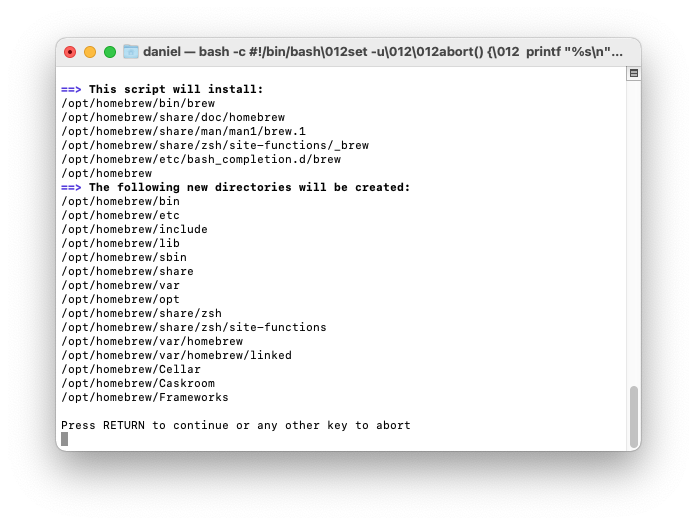
You'll see a list of files and folders that Homebrew will install.
Option to install Xcode Command Line Tools
If you haven't already installed Xcode Command Line Tools, you'll see a message that "The Xcode Command Line Tools will be installed." Press return to continue when prompted by the Homebrew installation script. It takes one to two minutes to download and install the Command Line Tools.
You’ll see diagnostic and progress messages. Homebrew installation takes 1.5 minutes on a 2021 Mac M1 Mini, with a 100Mbps Internet connection. It's significantly slower on Mac Intel over a slow Internet connection.
Mac Intel
On older Mac Intel machines, that's all you need to do; Homebrew is ready to use. On Mac Intel, Homebrew installs itself into the /usr/local/bin directory, which is already configured for access by the shell with the macOS default $PATH environment variable (the default is set by the /usr/libexec/path_helper command).
Mac M1, M2, M3, M4
On newer Apple Silicon machines, there's one more step to install Homebrew on a Mac. Homebrew files are installed into the /opt/homebrew folder. But the folder is not part of the default $PATH.
Homebrew checks the shell configuration
$PATH is a shell environment variable that shows where executable programs are located. When you run a command in the terminal, the shell searches through the directories listed in your $PATH variable to find the executable file for that command. With a correct $PATH, you don't need to type the full path to a program every time you want to run it.
The Homebrew install script will check if you've previously set a $PATH that includes the Homebrew folders (this is likely if you installed Homebrew previously).
Add to the PATH setting (first time users)
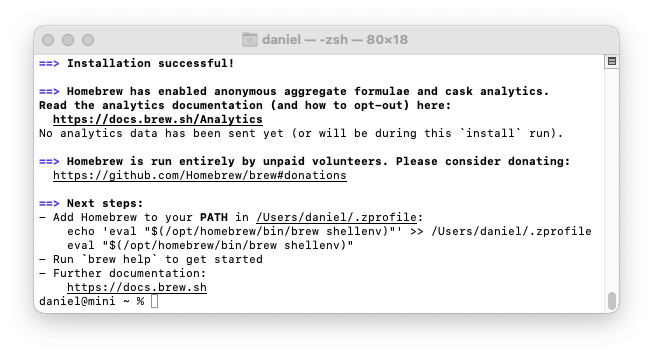
If you're a first time Homebrew user, Homebrew will display instructions to set the $PATH environment variable, as well as other Homebrew-related environment variables.
Homebrew shows instructions at the end of the installation process. Follow Homebrew's advice and set up a ~/.zprofile file which contains a command which sets up Homebrew:
==> Next steps:
- Run these two commands in your terminal to add Homebrew to your `$PATH`:
    (echo; echo 'eval "$(/opt/homebrew/bin/brew shellenv)"') >> ~/.zprofile
    eval "$(/opt/homebrew/bin/brew shellenv)"
The example above contains the Unix ~ tilde shortcut. The Homebrew console output will show your user directory name instead.
Be very careful to copy the commands exactly. It's best to copy and paste. If you enter the commands manually and you enter a single > instead of the double >> you will replace the .zprofile instead of appending.
The shell eval command executes the commands in the shellenv file found in the /opt/homebrew/bin/brew folder.
Alternative shell configuration
Alternatively, you can use a text editor to edit the ~/.zprofile file. For TextEdit, use open ~/.zprofile to edit the file. You'll need to add the line eval "$(/opt/homebrew/bin/brew shellenv)" to the file.
Here's what a Homebrew $PATH setting looks like:
eval "$(/opt/homebrew/bin/brew shellenv)"
Some developers don't use the ~/.zprofile file, preferring to set the shell configuration in the ~/.zshrc file. The article .zshrc or .zprofile explains the differences. Homebrew recommends using the ~/.zprofile file.
Shell configuration explanation
Here's what the brew shellenv command does. It sets environment variables for PATH, MANPATH, INFOPATH, HOMEBREW_PREFIX, HOMEBREW_CELLAR, and HOMEBREW_REPOSITORY. If you don't use the brew shellenv command, you can achieve the same result by setting environment variables directly in your ~/.zprofile or ~/.zshrc files.
export HOMEBREW_PREFIX="/opt/homebrew";
export HOMEBREW_CELLAR="/opt/homebrew/Cellar";
export HOMEBREW_REPOSITORY="/opt/homebrew";
export PATH="/opt/homebrew/bin:/opt/homebrew/sbin${PATH+:$PATH}";
export MANPATH="/opt/homebrew/share/man${MANPATH+:$MANPATH}:";
export INFOPATH="/opt/homebrew/share/info:${INFOPATH:-}";
The Homebrew site doesn't explain the purpose of the shell configuration, and while this might seem like unnecessary detail, it is essential and you will need to know how it works if you need to troubleshoot.
For more about configuring the shell, see Shell Configuration and the Mac Path. You don't need to use Homebrew's brew shellenv command if you want to set the $PATH yourself.
Verify Homebrew installation
Try a quick check:
$ brew --version
You should see a version number such as Homebrew 6.x.x (the exact version may differ as Homebrew is updated frequently).
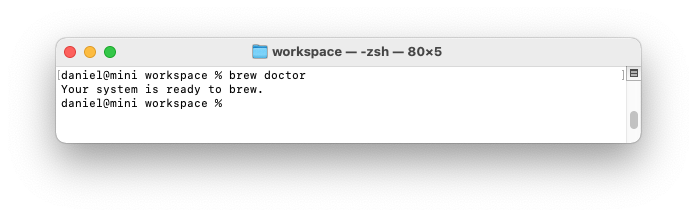
Check that Homebrew is installed properly.
$ brew doctor
You should see:
Your system is ready to brew.
Troubleshooting
On newer non-Intel Macs, if you see zsh: command not found: brew, check that you've created a ~/.zprofile file as described above and restart your terminal application. You can see Zsh: command not found: brew for details.
If Homebrew is successfully installed, there will be Homebrew files in /usr/local/bin (for macOS Intel) or /opt/homebrew (for Apple Silicon).
Listing installed packages
As you use Homebrew, it is helpful to see a list of all the packages you've installed:
$ brew list
You can also see a diagram of packages and dependencies.
$ brew deps --tree --installed
Right now, immediately after installation, these commands show nothing is installed.
Now you can use Homebrew to install packages.
Failures after a macOS upgrade
After a macOS upgrade, the upgrade process may remove the Command Line Tools. This can be annoying if you install an upgrade and then find you can't use commands such as git. You may encounter an error like:
xcrun: error: invalid active developer path (/Library/Developer/CommandLineTools),
missing xcrun at: /Library/Developer/CommandLineTools/usr/bin/xcrun
With Homebrew installed, brew doctor may show problems after a macOS upgrade:
% brew doctor

Warning: Git could not be found in your PATH.
Homebrew uses Git for several internal functions, and some formulae use Git
checkouts instead of stable tarballs. You may want to install Git:
  brew install git

Warning: No developer tools installed.
Install the Command Line Tools:
  xcode-select --install
The upgrade process may have removed the Command Line Tools. See the guide Reinstall Xcode Command Line Tools.
Continue setting up your Mac
Now you have both Xcode Command Line Tools and Homebrew installed. If you want to learn more about adding Homebrew packages to set up your development environment, see Install a Homebrew Package. Be sure to Configure Git and add a language version manager (I recommend Mise). You can use Homebrew to install programming languages such as Java, Python, or Ruby.
Don't miss the full visual roadmap and checklist that shows how to set up a Mac for software development, with all the essential tools and settings you might not yet know about.